Are you looking to set up a scheduled business hours call flow for your organization? Here’s how you can do it in a few simple steps using WhatConverts:
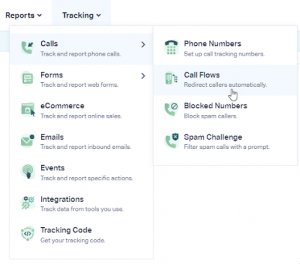
Step 1: Log in to your WhatConverts profile and click “Tracking” from the top menu. Then, select “Phone Calls” and click “Call Flows.” Click “Add Call Flow” to get started.
Step 2: Name your Call Flow, select “Incoming Call Flow,” and then “Scheduled Business Hours.” Click on “Next Step” to proceed.
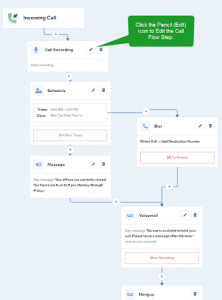
- Edit the Call Recording step to set up a Call Greeting and toggle “Enable” or “Disable” Call Recording. Remember that call recording laws vary at the state, federal, and county levels, so make sure to refer to the laws and regulations of your jurisdiction. Also, include a message letting the caller know the call is being recorded.
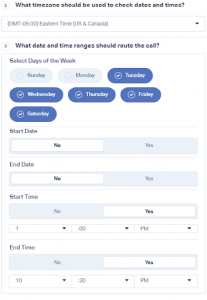
- Edit the Schedule step to set up your business hours. By default, the Schedule step is set up to forward calls to a destination number from Monday to Friday, 8:00 AM to 5:00 PM. When editing the Schedule step, name it, select your timezone, and choose the days your business is open. Highlight the appointed day in blue. Then, choose the start and end time of your business hours. Click “Save Changes.” The picture below shows a business open Tuesday through Saturday, 1:00 PM until 10:30 PM Eastern Time.
- Edit the Dial Step(s). Give your module a name that identifies the step. Select how the calls will be connected by choosing Direct Call, Multi-Ring (to call multiple phone numbers simultaneously), or Round Robin (to call numbers in a sequence). Enter the “Destination Number” for your step, choose the number of seconds the Dial step will ring before moving on to the next step, specify the Caller ID that the recipient will see, select a Call Whisper option, and add a Post Call Flow if you have one. Click “Save Changes.”
- Edit the Voicemail step for unanswered calls. Give your module a name that identifies the step, choose whether you would like the prompt to “Say Message” or “Play Recording,” decide if you want the voicemail to play a Beep, and select the maximum length of the voicemail message. Click “Save Changes.”
Once you have made all the necessary edits to your Call Flow, click “Finish.”
Step 3: Apply your Call Flow to your tracking number(s). Go to “Tracking” from the top menu, then “Phone Calls” and “Phone Numbers.” Click the “Edit Icon” at the end of the row to edit your tracking number(s). Under “Where should we forward incoming calls?” select “Call Flow” and choose your new Call Flow from the drop-down menu. Click “Finish” to save your changes.
Now you’re all set with a scheduled business hours call flow that will help streamline your incoming calls!


